Altula
Welcome to Altula Canada
- Contact Us
- Contact Us
- 877-908-2113 (Canada)
- +44 (0) 2036 080 627 (UK)
- Sales
- Languages
In this example, you’ll learn to create a hotspot with employee contact details.
Step 1: Create a profile. The profile will determine the hotspot contents.
– Click the Profile tool on the View menu.

– This opens the Profile panel.
– Click the link in the middle of the panel to create a new profile.

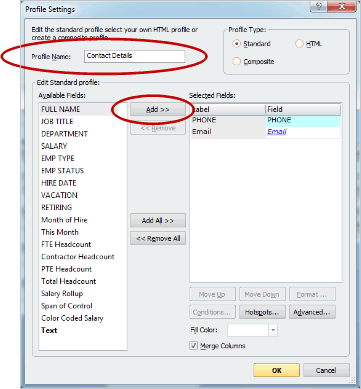
– Name the profile and select the fields you’d like to include. Available fields appear on the left. Select a field and click the Add button to add it to the profile.
*Note: All fields are included by default. Use the remove button to remove fields.

– Use the Format button and Fill Color option to highlight a field.
– Click OK.
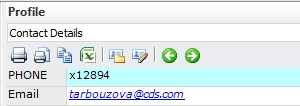
– The Profile is now created.

Step 2: Now it’s time to turn your profile into a hotspot. First, select a field in your box layout that you’d like to activate the hotspot. When a viewer’s cursor is on this field, the hotspot will display.
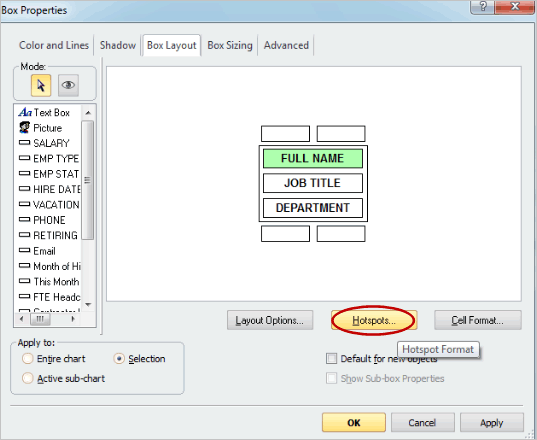
– Right-click a box and select Box Properties; click the Box Layout tab.

– Select a field in the box layout and click the Hotspots button. In this example the Full Name field will activate the hotspot.

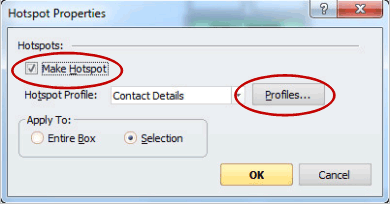
– Check the Make Hotspot box and select the Profile.

– Click OK.
– Select ‘Apply to Entire Chart’ to enable the hotspot feature for all boxes; click OK.

– The hotspot is now visible when the cursor hovers over the name field.

– Publish your chart to HTML or to the OrgPlus Plugin to make hotspots visible when sharing your charts with others.